Friday, March 27, 2009

Backup and Restore your System - III: Using the Rescue Disk to restore your System

While Part I of this 3-part tutorial told you how to create a "mirror" image of your System Disk or Sytem Drive and Part II told you how to create the Rescue Disk that you need to restore your system, this part tells you how to use the Rescue Disk to restore your system.

You may want to print this sub-tutorial and store it safely because you won't have access to files on your hard disk or the Internet while restoring your system.

First of all, you need to make sure that your CD-ROM Drive is the Primary Boot Disk. This involves tinkering with the CMOS settings of your computer and can be a bit tricky. You can check this article from computercompanion.com for an explanation of the CMOS and BIOS.

Now, the problem is that there is no standard way to enter the CMOS and change the settings. Different computers have different ways to do this so I'm going to give a general description of how it's done.

First, figure out how to enter CMOS Setup:

To do this, restart your computer and READ all those messages that flash on the screen. The bottom of the screen tells you what key to hit to enter Setup. This may be called "CMOS Setup", "BIOS Setup" or just "Setup".

If you have good reflexes, you can hit that key at that point and carry on from there. I'm presuming you've printed this sub-tutorial and can therefore read what to do next when you're in CMOS Setup.

In most cases, especially newer computers with better processing capabilities, you won't be able to hit the key fast enough, though. If so, don't panic. Restart the computer over and over again until you're sure which key will take you to BIOS Setup (or CMOS Setup, or Setup). Then restart your computer one more time and repeatedly hit that key once your screen goes black. Don't keep it pressed, hit it repeatedly.

You should be presented with a screen that's primarily blue or blue and grey, with text in white.

Congratulations! You're in CMOS / BIOS Setup!

Next, Examine / Change the Boot Sequence:

Look for a tab or option that says, "Boot". Use the ARROW keys (or + / - keys on some computers) on your keyboard to go to that tab / option and hit Enter. The mouse doesn't work in CMOS Setup.

When you're in the Boot tab / screen, look for an option that says, "Boot Sequence" or "Boot Order" or anything that indicates the order in which the computer will examine drives in order to start.

If that option isn't the one highlighted, use the arrow keys to go up, down, left or right to highlight it and hit Enter.

You'll be shown the Boot Order or Boot Sequence, which is the sequence in which the computer looks for bootable drives. Make sure your CD-ROM Drive is the first. The screen should have instructions on changing the boot order, usually on the bottom right of the screen.

Once you've set the CD-ROM Drive as the Primary Boot Disk or Device, save the settings and exit. The screen should have instructions on how to do this. It's usually the F10 key.

Now for actually using the Rescue Disk!

This is actually the easiest part of the whole exercise. Just insert your Rescue CD, restart the computer (you may need to use the physical restart button if your system has crashed completely) and follow instructions as they appear.

Here's what will happen:

  • Your computer will start
  • The Restore Wizard will start. Click Next
  • You'll be taken to the "Locate image" screen. Navigate to wherever you've stored the image file you created in Part I
  • Click Next. You'll be asked which Partition you want to Restore. This is usually C: or C Drive. To cut it short, it's the drive you backed up in Part I. Click the check box next to that Drive / Partition to select it
  • You'll be asked to choose the Partition again. JUST CLICK "Next" without changing anything
  • You'll be asked to select the New Partition Type. Make sure "Active" is selected and click "Next"
  • You'll be asked if you want to verify the image file you created. Select "Yes"
  • You'll then be asked if you want to verify the file system integrity at reboot. Select "No" if you want your computer to restart more quickly after the Restore is done
  • Click "Finish" on the next screen. The check (if selected) and restoration process will start. It took about an hour for my computer, which has all kinds of programs installed. It might take less for yours, or more. There are no benchmarks for this. For gosh sake don't lose patience and hit "Cancel". If you do, you might have to start the whole reboot--> restore process all over again
  • You'll get a dialog box that the Partition image has been successfully restored. Click OK
  • You'll be presented with another dialog box that offers you two choices, "Back" and "Cancel". Click, "Cancel". I know that this last step is confusing but click, "Cancel". Your computer will restart and your familiar desktop will soon stare you in the face.
That's it. You've successfully cut days of work to a couple of hours. You don't have to reinstall your software or Anti-virus or anything. Your system (computer) is back to where it was when you backed it up.

Deepak

Thursday, March 26, 2009

Backup & Restore your System - II: Creating the Rescue Disk

Part I of this three-part tutorial covered the hardest part, creating the mirror image or backup of your System Disk for Winows XP. The next part is to create your Rescue Disk.

If your computer crashes for any software-related reason and you can't restart it normally, you'll need some way to access the mirror file you made in Part I of the process. You can do this by using a Rescue Disk, which obviously have to make BEFORE your system crashes (unless you have access to another computer that works and can create the disk there).

Creating a Linux-based Rescue Disk is a very simple operation and works in most cases. If it doesn't, ask me directly and I'll make a tutorial on creating a Rescue Disk with Bart PE, another option in creating a Rescue Disk. This post tells you only how to create a Linux-based Rescue Disk.

This is a very simple operation and can be a one-step process once you've started Macrium Reflect. At the maximum, it'll be a two-step process if you haven't already put a blank CD into your CD-writer. Here's how to do it:

Start Macrium Reflect by going to Start--> All Programs--> Macrium--> Reflect--> Reflect

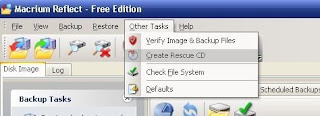
In Macrium Reflect, go to Other Tasks--> Create Rescue CD


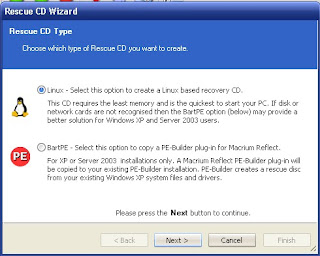
You'll be presented with the following screen:


Select the "Linux" radio button and click, "Next"

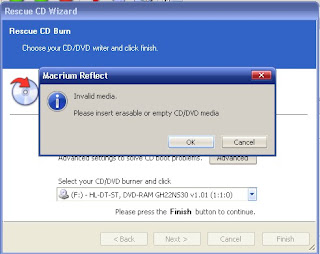
If you haven't already inserted a blank CD into your CD-Writer, you will be prompted to do so:


Insert a blank CD, click "OK" and then, "Next".

Then just sit back while Macrium Reflect creates your Linux-based Rescue CD. It hardly takes a minute or so.

If this process doesn't work for you, write a comment that it doesn't or ask me directly and I'll write a tutorial on creating a Win-XP based Rescue Disk.

Deepak

Monday, March 23, 2009

Backup and Restore your System Drive (Windows XP) with Macrium - I

If you're anything like me, you frequently format your System Drive (the drive that "boots" or starts up your computer - usually C: or C Drive). Even if you don't do it frequently, Windows being what it is, you might have to format the System Drive and reload Windows at some point.

And then you have to reinstall all your programs.

MS Office, Yahoo Messenger, the works.

A pain, right?

You can avoid the heartache by creating a mirror image of your System Drive and then just reinstalling it when there's a problem. It's actually a 3-step process:

Step 1: Back up your System Disk while your computer still works fine

Step 2: Create a Rescue Disk that can use the backup file

Step 3: Boot your system from the Rescue Disk and reinstall the backed up file

That's it! You're back to where you were before your system went haywire!

Part 1 of this tutorial deals with the first step, backing up your system files so that you can restore it later.

Part 2 will deal with creating the Rescue Disk and Part 3 will deal with actually reinstalling your system disk so that you lose no time in getting back to work.

You better perform Step 1 right now, while your computer still works. There's no telling when it'll go kaput, so there's no harm and plenty of good in backing up the system disk right now. Here's how:

Firstly, you have to understand that your computer starts up because of your system disk. With Windows, this is usually your C Drive, where Windows is installed by default. So, if you've bought a desktop or laptop with Windows pre-installed, Drive C is your system disk. If you bought an assembled PC and asked the hardware guy to install Windows XP on another drive, that's your System Disk. Ask your hardware guy which your system disk is if you aren't sure. The rest of this tutorial presumes that you bought a standard desktop or laptop with Windows XP pre-installed. That makes your C Drive the system disk.

First, you need to download and install the Macrium software.

The free version is available here.

Download it to your computer, double-click the downloaded file and follow instructions in the installer. The Macrium backup software will be installed on your computer.

Once installed, the installer should give you an option to start Macrium backup upon exiting the installer. If it doesn't, or you didn't keep the "Launch Macrium" checkbox checked, just go to Start-->All Programs-->Macrium-->Reflect-->Reflect and you're good to go.

This is where you actually create the backup. Keep track of where you save the backup file, it's important.

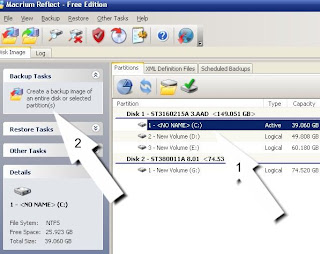
In Macrium, Select your System Drive and click the "Create a backup image..." message on the left.


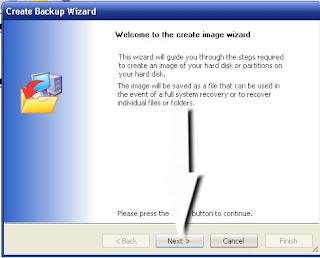
You'll be taken to the "Create Image" Wizard.

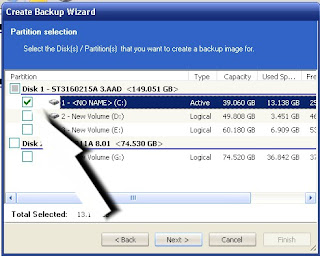
Blindly click "Next". The wizard will then ask you which drive to back up. This has to be your system drive. It's usually C Drive in Windows (all versions) but if you're unsure, ask your hardware guy.


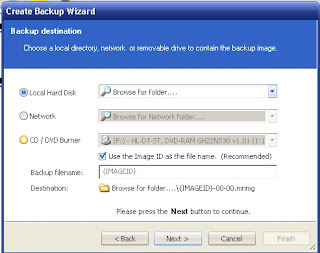
After that, it'll ask where you want to save the image file. Any drive other than the system drive is fine. That means any drive other than C if you bought a standard PC / laptop with Windows pre-installed, or ask your hardware guy if you're unsure. This tutorial presumes that you have drives other than C installed. You'll need about 15 gb of space, so choose a drive that has that much of free space at the minimum.

You can also save the image file to a CD / DVD. If you want to do that, select the CD / DVD Burner radio button, click next, and follow instructions.


Depending on the option you've selected and the amount of data on your system drive, it'll take from a few minutes to an hour or more to create the copy of your System Disk. It's worth the wait.

Once the wizard tells you that the image has been created, Part 1 of your backup / restore process is done.

The next step is to create your Rescue Disk so that you can start up your computer in case things go wrong and Step 3 is to restore it to its state before things suddenly went haywire. I'll be covering those steps in the next two tutorials.

Meanwhile, back up your system drive NOW!

Deepak